Difference between revisions of "Setting up a server"
Rubenwardy (talk | contribs) |
ROllerozxa (talk | contribs) (Elaborate !!) |
||
| (26 intermediate revisions by 7 users not shown) | |||
| Line 1: | Line 1: | ||
{{Languages}} | {{Languages}} | ||
| + | |||
| + | == Choosing Hardware == | ||
| + | It's recommended that you use a VPS or dedicated server to host a game server which you want to make publicly available. Residential Internet connections tend to be unreliable and also have less upload speed. You may also not be able to keep a server online 24/7 when hosting from home. | ||
| + | |||
| + | That being said, hosting from home will work fine if you have some hardware you can keep online, and you have a good enough Internet connection. Keep in mind that if you are behind CG-NAT, you are unable to host a public server from home at all as it won't be accessible to the wider internet. | ||
| + | |||
| + | Minetest does have a ''Host Server'' option in the main menu, which is fine for temporary servers for a couple of friends, but if you want to run a public server you would want to run it dedicated as it can be kept online independent of the client being active. | ||
| + | |||
| + | == External and Internal IPs == | ||
| + | When hosting from home it is necessary to know both your external and internal IP and understanding the difference between the two. The guide will reference these addresses multiple times later so it is good to know what they are for you. | ||
| + | |||
| + | === External IP === | ||
| + | Your external IP address is the Internet facing address you have. It is what websites see and what people will need to connect to when joining your server. In order to find your external IP address you can simply search "what is my ip address" on DuckDuckGo and it should show it: | ||
| + | |||
| + | [[File:External_IP.webp]] | ||
| + | |||
| + | https://wiki.minetest.net/images/5/5c/External_IP.webp | ||
| + | |||
| + | === Internal IP === | ||
| + | Your internal IP address is the address that your computer has on the local network. It is the address the computer uses when communicating to other computers on the local network as well as the router. See the following instructions for each platform: | ||
| + | |||
| + | '''Windows:''' | ||
| + | |||
| + | # Open a command prompt: Press Win + X, type cmd.exe and press Enter. | ||
| + | # Type <code>ipconfig</code> | ||
| + | # Depending on your setup, you may have multiple network connections that show up. What you should focus on is an Ethernet or Wi-Fi connection, depending on how you have your computer connected to the router. | ||
| + | |||
| + | Your internal IP will be the address listed as “IPv4 Address”, and should (but may not necessarily) begin with 192.168.X.X. | ||
| + | |||
| + | [[File:Windows_internal_ip.webp]] | ||
| + | |||
| + | https://wiki.minetest.net/images/e/eb/Windows_internal_ip.webp | ||
| + | |||
| + | '''Linux:''' | ||
| + | |||
| + | # Open a terminal. | ||
| + | # Type <code>ip addr</code> | ||
| + | # Look for "inet" near "wlan0", "eth0" or something similar in the resulting output. It's usually somewhere within 192.168.0.0/16 but may be in another block. | ||
| + | |||
| + | '''macOS:''' | ||
| + | |||
| + | # Open a terminal. | ||
| + | # Type <code>netstat -nr</code> | ||
| + | # Figure it out | ||
| + | |||
| + | == Checking for CGNAT == | ||
| + | Carrier-grade NAT (CGNAT) is a technique used by some ISPs where many customers will share one single IP address, in order to conserve the amount of IPv4 addresses the ISP owns. As mentioned above this also means that you will be unable to host a server from home without additional steps, as it won’t be directly accessible from the wider Internet. So if you are going to be hosting from home you should first check whether you are behind CGNAT. | ||
| + | |||
| + | Then follow the steps for your operating system to run a traceroute: | ||
| + | |||
| + | '''Windows:''' | ||
| + | |||
| + | # Open a command prompt: Press Win + X, type cmd.exe and press Enter. | ||
| + | # Type <code>tracert <external IP></code>. | ||
| + | |||
| + | '''Linux:''' | ||
| + | |||
| + | # Open a terminal. | ||
| + | # Type <code>traceroute <external IP></code> (requires traceroute to be installed) | ||
| + | |||
| + | === Analysing the traceroute === | ||
| + | |||
| + | Whether you are behind CGNAT or not can be determined based on the amount of hops the traceroute will return. If the traceroute returns a single hop and then finishes then you are not behind CGNAT: | ||
| + | |||
| + | traceroute to 78.71.XX.XX (78.71.XX.XX), 30 hops max, 60 byte packets | ||
| + | 1 78-71-XX-XX.example.org (78.71.XX.XX) 0.567 ms 0.643 ms 0.702 ms | ||
| + | |||
| + | However, if there are two or even more hops, or if the traceroute does not complete, then you are most likely behind CGNAT and will not be able to host a publicly available server without extra steps. | ||
| + | |||
| + | === If you are behind CGNAT === | ||
| + | First of all, try contacting your ISP or check their website. Some ISPs are willing to move you onto a bare IP (may also be referred to as a “public” IP) if requested, by contacting them directly or through a page on their website. If asked for the motivation, say that you want to host a game server. | ||
| + | |||
| + | If they are unwilling to do this, or require you to upgrade to a business plan to provide this service, you will need to rent a VPS/dedicated in the cloud to host your server or to create a tunnel to your home network. | ||
| + | |||
| + | == Obtaining a server binary == | ||
| + | |||
| + | === Linux === | ||
| + | ''Note: If you are going to be running a Minetest server on a non-headless system, using the regular <code>minetest</code> binary with the <code>--server</code> argument works the same as <code>minetestserver</code>. If you are on a headless Linux system without a graphical environment <code>minetestserver</code> is recommended as it is smaller and does not have extra dependencies that are unnecessary for a server.'' | ||
| + | |||
| + | Usually your Linux distribution of choice will have <code>minetestserver</code> in its official repositories. However this package may be several releases outdated, so obtaining a server binary through other means is to be recommended. | ||
| + | |||
| + | You may choose to build from source, in which case you should specify <code>-DRUN_IN_PLACE=TRUE -DBUILD_CLIENT=FALSE -DBUILD_SERVER=TRUE</code> which will build a minetestserver binary running in place. When built, you can move <code>bin/</code> and <code>builtin/</code> to a new folder, or if you're building on a separate machine from the server, transfer them onto the server. See the README.md file for more information about compiling Minetest from source. | ||
| + | |||
| + | There also exist ready made Docker images for minetestserver, such as [https://github.com/minetest/minetest/blob/master/Dockerfile the Dockerfile in the Minetest source tree] or [https://hub.docker.com/r/warr1024/minetestserver Warr1024's Docker image]. | ||
| + | |||
| + | === Windows === | ||
| + | The regular Windows builds provided on the download page work fine, running it as <code>minetest.exe --server</code> to access the server portion of it. | ||
| + | |||
| + | |||
== Running the Server == | == Running the Server == | ||
| + | As of 5.8.0, Minetest no longer ships with a default game meaning you will have to provide your own game to use with the server. You can browse the games on [https://content.minetest.net/packages/?type=game ContentDB] and download one to put in the games/ folder for your server. | ||
| − | === | + | === Linux === |
| + | # Open a terminal. | ||
| + | # Navigate to wherever you've put your Minetest server files (referred to as /Minetest/ from now on), and run the server with <code>/bin/minetestserver</code>. '''(PLEASE READ THE NOTES BELOW!)''' | ||
| + | #* If you want to specify a specific game ID, the game ID choices are located in <code>/Minetest/games/</code>. Add in <code>--gameid '''thegameid'''</code> to the end of the command. | ||
| + | #* If you get the error “Multiple worlds are available.”, the world choices are located in <code>/Minetest/worlds/</code>. Add in <code>--worldname '''theWorld'''</code> to the end of the command. | ||
| + | # If your server crashes, then look in the <code>debug.txt</code> log file in <code>/Minetest/</code> | ||
| + | # Make sure you make your server [[#Protecting your server|safe from damage]]. | ||
| − | + | For easier server management (and also automatically restarting the server when it crashes) you can create a file named run_server.sh or the like in the /Minetest/ folder with this: | |
| − | |||
| − | |||
| − | + | #!/bin/bash | |
| − | + | ||
| − | + | while true | |
| − | + | do | |
| + | ./bin/minetestserver --gameid minetest --worldname world --terminal | ||
| + | sleep 2 | ||
| + | done | ||
| − | + | If you're on a headless server you'd want to run the server in some kind of multiplexer like <code>screen</code>. Run <code>screen -h 10000 -S minetest ./run_server.sh</code>, <code>Ctrl+A Ctrl+D</code> to detach, and <code>screen -r</code> to reattach at a later date. | |
| − | + | If you're going to be running multiple servers you may want to separate their files between eachother. One good way to do that would be to make a servers/ folder as a sibling to your bin/ folder, make a folder for each server, and use something like this for running the server: | |
| − | |||
| − | |||
| − | |||
| − | |||
| − | |||
| − | + | #!/bin/bash | |
| − | #!/bin/bash | ||
| − | ./minetestserver -- | + | while true |
| + | do | ||
| + | ../../bin/minetestserver --world "world" --config "minetest.conf" --logfile "server.log" --terminal | ||
| + | sleep 2 | ||
| + | done | ||
| + | |||
| + | It will store the server's world, config and log contained within its own folder such that it won't conflict with another server. | ||
=== Windows === | === Windows === | ||
| − | + | # Open command prompt by going in the Minetest installation folder. Then in the “bin” folder, click the blue "File" icon in the top left of the screen. In the drop down menu click “Open Windows Powershell here”. | |
| − | #Open command prompt by going in the Minetest installation folder | + | # Type this: <code>.\minetest.exe --server</code>. |
| − | #Type this: <code>minetest.exe --server</code>. | + | #* If you get the error “Multiple worlds are available.”, use <code>.\minetest.exe --server --worldname '''world_name'''</code> instead, where <code>'''world_name'''</code> is the name of the world. |
| − | #*If you get the error “Multiple worlds are available.”, use <code>minetest.exe --server --worldname '''world_name'''</code> instead, where <code>'''world_name'''</code> is the name of the world. | + | # If your server crashes, then look at the <code>debug.txt</code> in <code>/Minetest/bin/</code> |
| − | #If your server crashes, then look at the <code>debug.txt</code> in <code>/Minetest/bin/</code> | + | # Make sure you make your server [[#Protecting your server|safe from damage]]. |
| − | #Make sure you make your server [[#Protecting your server|safe from damage]]. | ||
If you don't like to start the crashed server, simply start the server out of a batch file which contains the following code: | If you don't like to start the crashed server, simply start the server out of a batch file which contains the following code: | ||
| Line 45: | Line 141: | ||
== Allowing external players to connect == | == Allowing external players to connect == | ||
| − | + | === Firewall === | |
| + | On Linux, you most likely know if you have a firewall installed and configured (e.g. iptables or ufw). Be sure to allow the Minetest server to communicate over UDP on the specified port. | ||
| − | + | On Windows, the Windows Defender firewall will prompt you whether Minetest should be allowed access. This may even pop up the first time you play singleplayer in the client, and if you did not grant it permission you will need to open the Windows Defender Firewall with Advanced Security and accept it from there. | |
| − | + | ||
| − | + | [[File:Windows_defender_minetestserver.webp]] | |
| − | + | ||
| − | + | https://wiki.minetest.net/images/c/c4/Windows_defender_minetestserver.webp | |
| − | + | ||
| − | + | === Port forwarding === | |
| − | # | + | If you are self-hosting a server you will usually need to port forward the server in your router for it to be accessible to the outside internet. This isn't necessary for LAN play, as you'll simply provide the internal IP of the server accessible within the local network. |
| − | #Login to your router, and port forward UDP on your | + | |
| − | #Alter any firewalls you may have to allow traffic to the port you choose | + | # Choose a port to run the server on. The default of 30000 is recommended, and if you host several it is recommended to increment upwards. (e.g. 30001, 30002...) |
| − | + | # Login to your router, and port forward UDP on the chosen port for your server computer. Depending on your router the port forwarding page may show you a list of devices connected with their hostname visible, otherwise you will need to input the internal IP of the computer you are hosting the server on. | |
| − | + | # Alter any computer firewalls you may have to allow traffic to the port you choose. | |
| − | + | ||
| − | + | === Server list === | |
| − | + | Make your server listed in the server list and by setting the following settings in minetest.conf: | |
| − | + | * <code>server_announce = true</code> - makes Minetest announce the server to the server list. | |
| − | + | * <code>server_name</code> - set the value of this to your server's name. | |
| − | + | * <code>server_description</code> - set the value of this to a longer description describing your server. | |
| + | * <code>server_address</code> - if you have a domain name for your server, then set this to the domain name ([[How to get a domain name for your server|how to get a domain name if you want one for your server]]). | ||
| + | ** Should ''only'' be the domain name (e.g. <code>coolserver.minetest.net</code>, not <code><nowiki>https://coolserver.minetest.net/woah/</nowiki></code>). If you do not have a domain name pointed to your server then do not add this setting or write anything for it, or the server list will reject your server. | ||
| + | * <code>server_url</code> - if you have a website for your server, then set this to the website URL. | ||
| + | * <code>motd</code> - a message that is sent to the player when they join. Use this to welcome them. | ||
| + | * ''Note:'' You need to restart to make changes in minetest.conf take effect. | ||
== Protecting your server == | == Protecting your server == | ||
| − | When setting up a new server, you should consider which protections are needed. This is extremely important for public servers, because you cannot predict who will connect or what they will do on your server. | + | === Protecting the Minetest world/server === |
| + | When setting up a new server, you should consider which protections are needed. '''This is extremely important for public servers''', because you cannot predict who will connect or what they will do on your server. | ||
Common problems include: | Common problems include: | ||
| Line 75: | Line 178: | ||
* Aggression, harassment or other unwanted behaviours between players. | * Aggression, harassment or other unwanted behaviours between players. | ||
* Trouble makers who evade bans. | * Trouble makers who evade bans. | ||
| − | * Impersonation of well known people within the | + | * Impersonation of well known people within the Minetest community. |
| − | + | * Bugs, for example caused by mods, which allow a malicious player to execute arbitrary system commands. | |
Many of these problems can be removed or minimised by advanced planning and awareness: | Many of these problems can be removed or minimised by advanced planning and awareness: | ||
| − | * Install a protection mod, such as [https:// | + | * Install a protection mod, such as [https://content.minetest.net/packages/ShadowNinja/areas/ areas] or [https://content.minetest.net/packages/TenPlus1/protector/ protectors]. These allow players to protect areas, which cannot be changed by other players. |
| − | * Enable rollback by adding <code> | + | * Enable rollback by adding <code>enable_rollback_recording = true</code> to [[minetest.conf]]. Rollback can tell you which player placed a node, and allows a player's actions to be reverted. |
| − | * Install a mod to help you manage bans, such as [https:// | + | ** NOTE: The engine rollback functionality is very limited and can't roll back griefing caused by mod-made node changes (e.g. spawning a bunch of trees or covering things in water). In addition to rollback, you should also always make regular backups of the map database. |
| + | * Install a mod to help you manage bans, such as [https://content.minetest.net/packages/kaeza/xban2/ xban2]. | ||
| + | * On the other hand, if you are setting up a private server, install a whitelist mod such as [https://content.minetest.net/packages/Zughy/whitelist/ whitelist]. | ||
* Create rules for your server and make sure you have enough time (or a team of moderators) to supervise your server and watch for players who breaks your rules. | * Create rules for your server and make sure you have enough time (or a team of moderators) to supervise your server and watch for players who breaks your rules. | ||
* Never grant privileges to a player just because they use a name you recognise. Player names are not reserved between servers, so you should always confirm who the player is. | * Never grant privileges to a player just because they use a name you recognise. Player names are not reserved between servers, so you should always confirm who the player is. | ||
| + | * Install and configure a chat filter mod like [https://content.minetest.net/packages/sofar/filter/ filter], to prevent swearing and/or sexual chat. This is useful to inform players of the rules rather than actual enforcement, as working around filters is fairly easy. | ||
| + | For more mods useful to server administration, see the [https://content.minetest.net/packages/?tag=server_tools Server Moderation and Tools] tag on ContentDB. See also the [https://content.minetest.net/packages/Warr1024/szutilpack/ SzUtilPack] package which is a modpack by Warr1024 that contains a lot of useful mods for server management such as automatic restarts, pruning players or additional useful chatcommands. | ||
| − | + | === Protecting the host machine === | |
| + | * Standard advice on Linux/Windows server security applies. | ||
| + | * On Linux you can add a dedicated user for running the minetest server. | ||
| + | * Never, ever, disable mod security. | ||
| + | * Make sure you trust mods you add to secure.trusted_mods | ||
== Managing your server == | == Managing your server == | ||
=== Server Configuration === | === Server Configuration === | ||
| − | |||
For a detailed explanation of the server configuration file, see the [https://github.com/minetest/minetest/blob/master/minetest.conf.example minetest.conf] page. | For a detailed explanation of the server configuration file, see the [https://github.com/minetest/minetest/blob/master/minetest.conf.example minetest.conf] page. | ||
| Line 97: | Line 207: | ||
=== Server Commands === | === Server Commands === | ||
| − | |||
See the [[Server commands]] page for a list of useful commands. | See the [[Server commands]] page for a list of useful commands. | ||
| Line 103: | Line 212: | ||
=== Privilege System === | === Privilege System === | ||
| − | |||
See the [[privileges]] page for detailed information on the privilege system. | See the [[privileges]] page for detailed information on the privilege system. | ||
== See also == | == See also == | ||
| − | * [[ | + | * If your server has lots of media it may be useful to set up a [[Remote media|remote media server]] for it. |
* For more possible commands study the [[Command line]] page. | * For more possible commands study the [[Command line]] page. | ||
* The "[https://forum.minetest.net/viewtopic.php?f=10&t=2870 Illustrated Server Creation Guide]" forum thread contains interesting discussion. | * The "[https://forum.minetest.net/viewtopic.php?f=10&t=2870 Illustrated Server Creation Guide]" forum thread contains interesting discussion. | ||
Latest revision as of 17:47, 24 February 2024
| English • Deutsch • français • italiano • 日本語 • русский |
Choosing Hardware
It's recommended that you use a VPS or dedicated server to host a game server which you want to make publicly available. Residential Internet connections tend to be unreliable and also have less upload speed. You may also not be able to keep a server online 24/7 when hosting from home.
That being said, hosting from home will work fine if you have some hardware you can keep online, and you have a good enough Internet connection. Keep in mind that if you are behind CG-NAT, you are unable to host a public server from home at all as it won't be accessible to the wider internet.
Minetest does have a Host Server option in the main menu, which is fine for temporary servers for a couple of friends, but if you want to run a public server you would want to run it dedicated as it can be kept online independent of the client being active.
External and Internal IPs
When hosting from home it is necessary to know both your external and internal IP and understanding the difference between the two. The guide will reference these addresses multiple times later so it is good to know what they are for you.
External IP
Your external IP address is the Internet facing address you have. It is what websites see and what people will need to connect to when joining your server. In order to find your external IP address you can simply search "what is my ip address" on DuckDuckGo and it should show it:
https://wiki.minetest.net/images/5/5c/External_IP.webp
Internal IP
Your internal IP address is the address that your computer has on the local network. It is the address the computer uses when communicating to other computers on the local network as well as the router. See the following instructions for each platform:
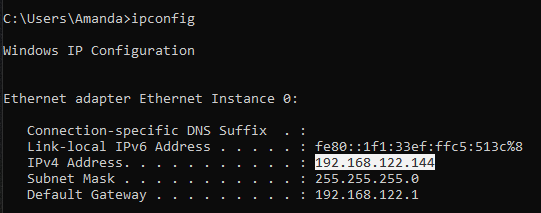
Windows:
- Open a command prompt: Press Win + X, type cmd.exe and press Enter.
- Type
ipconfig - Depending on your setup, you may have multiple network connections that show up. What you should focus on is an Ethernet or Wi-Fi connection, depending on how you have your computer connected to the router.
Your internal IP will be the address listed as “IPv4 Address”, and should (but may not necessarily) begin with 192.168.X.X.
https://wiki.minetest.net/images/e/eb/Windows_internal_ip.webp
Linux:
- Open a terminal.
- Type
ip addr - Look for "inet" near "wlan0", "eth0" or something similar in the resulting output. It's usually somewhere within 192.168.0.0/16 but may be in another block.
macOS:
- Open a terminal.
- Type
netstat -nr - Figure it out
Checking for CGNAT
Carrier-grade NAT (CGNAT) is a technique used by some ISPs where many customers will share one single IP address, in order to conserve the amount of IPv4 addresses the ISP owns. As mentioned above this also means that you will be unable to host a server from home without additional steps, as it won’t be directly accessible from the wider Internet. So if you are going to be hosting from home you should first check whether you are behind CGNAT.
Then follow the steps for your operating system to run a traceroute:
Windows:
- Open a command prompt: Press Win + X, type cmd.exe and press Enter.
- Type
tracert <external IP>.
Linux:
- Open a terminal.
- Type
traceroute <external IP>(requires traceroute to be installed)
Analysing the traceroute
Whether you are behind CGNAT or not can be determined based on the amount of hops the traceroute will return. If the traceroute returns a single hop and then finishes then you are not behind CGNAT:
traceroute to 78.71.XX.XX (78.71.XX.XX), 30 hops max, 60 byte packets
 1  78-71-XX-XX.example.org (78.71.XX.XX)  0.567 ms  0.643 ms  0.702 ms
However, if there are two or even more hops, or if the traceroute does not complete, then you are most likely behind CGNAT and will not be able to host a publicly available server without extra steps.
If you are behind CGNAT
First of all, try contacting your ISP or check their website. Some ISPs are willing to move you onto a bare IP (may also be referred to as a “public” IP) if requested, by contacting them directly or through a page on their website. If asked for the motivation, say that you want to host a game server.
If they are unwilling to do this, or require you to upgrade to a business plan to provide this service, you will need to rent a VPS/dedicated in the cloud to host your server or to create a tunnel to your home network.
Obtaining a server binary
Linux
Note: If you are going to be running a Minetest server on a non-headless system, using the regular minetest binary with the --server argument works the same as minetestserver. If you are on a headless Linux system without a graphical environment minetestserver is recommended as it is smaller and does not have extra dependencies that are unnecessary for a server.
Usually your Linux distribution of choice will have minetestserver in its official repositories. However this package may be several releases outdated, so obtaining a server binary through other means is to be recommended.
You may choose to build from source, in which case you should specify -DRUN_IN_PLACE=TRUE -DBUILD_CLIENT=FALSE -DBUILD_SERVER=TRUE which will build a minetestserver binary running in place. When built, you can move bin/ and builtin/ to a new folder, or if you're building on a separate machine from the server, transfer them onto the server. See the README.md file for more information about compiling Minetest from source.
There also exist ready made Docker images for minetestserver, such as the Dockerfile in the Minetest source tree or Warr1024's Docker image.
Windows
The regular Windows builds provided on the download page work fine, running it as minetest.exe --server to access the server portion of it.
Running the Server
As of 5.8.0, Minetest no longer ships with a default game meaning you will have to provide your own game to use with the server. You can browse the games on ContentDB and download one to put in the games/ folder for your server.
Linux
- Open a terminal.
- Navigate to wherever you've put your Minetest server files (referred to as /Minetest/ from now on), and run the server with
/bin/minetestserver. (PLEASE READ THE NOTES BELOW!)- If you want to specify a specific game ID, the game ID choices are located in
/Minetest/games/. Add in--gameid thegameidto the end of the command. - If you get the error “Multiple worlds are available.”, the world choices are located in
/Minetest/worlds/. Add in--worldname theWorldto the end of the command.
- If you want to specify a specific game ID, the game ID choices are located in
- If your server crashes, then look in the
debug.txtlog file in/Minetest/ - Make sure you make your server safe from damage.
For easier server management (and also automatically restarting the server when it crashes) you can create a file named run_server.sh or the like in the /Minetest/ folder with this:
#!/bin/bash

while true
do
	 ./bin/minetestserver --gameid minetest --worldname world --terminal
	sleep 2
done
If you're on a headless server you'd want to run the server in some kind of multiplexer like screen. Run screen -h 10000 -S minetest ./run_server.sh, Ctrl+A Ctrl+D to detach, and screen -r to reattach at a later date.
If you're going to be running multiple servers you may want to separate their files between eachother. One good way to do that would be to make a servers/ folder as a sibling to your bin/ folder, make a folder for each server, and use something like this for running the server:
#!/bin/bash

while true
do
	../../bin/minetestserver --world "world" --config "minetest.conf" --logfile "server.log" --terminal
	sleep 2
done
It will store the server's world, config and log contained within its own folder such that it won't conflict with another server.
Windows
- Open command prompt by going in the Minetest installation folder. Then in the “bin” folder, click the blue "File" icon in the top left of the screen. In the drop down menu click “Open Windows Powershell here”.
- Type this:
.\minetest.exe --server.- If you get the error “Multiple worlds are available.”, use
.\minetest.exe --server --worldname world_nameinstead, whereworld_nameis the name of the world.
- If you get the error “Multiple worlds are available.”, use
- If your server crashes, then look at the
debug.txtin/Minetest/bin/ - Make sure you make your server safe from damage.
If you don't like to start the crashed server, simply start the server out of a batch file which contains the following code:
@echo off
:crash
minetest.exe --server --worldname world_name
goto crash
Allowing external players to connect
Firewall
On Linux, you most likely know if you have a firewall installed and configured (e.g. iptables or ufw). Be sure to allow the Minetest server to communicate over UDP on the specified port.
On Windows, the Windows Defender firewall will prompt you whether Minetest should be allowed access. This may even pop up the first time you play singleplayer in the client, and if you did not grant it permission you will need to open the Windows Defender Firewall with Advanced Security and accept it from there.
https://wiki.minetest.net/images/c/c4/Windows_defender_minetestserver.webp
Port forwarding
If you are self-hosting a server you will usually need to port forward the server in your router for it to be accessible to the outside internet. This isn't necessary for LAN play, as you'll simply provide the internal IP of the server accessible within the local network.
- Choose a port to run the server on. The default of 30000 is recommended, and if you host several it is recommended to increment upwards. (e.g. 30001, 30002...)
- Login to your router, and port forward UDP on the chosen port for your server computer. Depending on your router the port forwarding page may show you a list of devices connected with their hostname visible, otherwise you will need to input the internal IP of the computer you are hosting the server on.
- Alter any computer firewalls you may have to allow traffic to the port you choose.
Server list
Make your server listed in the server list and by setting the following settings in minetest.conf:
server_announce = true- makes Minetest announce the server to the server list.server_name- set the value of this to your server's name.server_description- set the value of this to a longer description describing your server.server_address- if you have a domain name for your server, then set this to the domain name (how to get a domain name if you want one for your server).- Should only be the domain name (e.g.
coolserver.minetest.net, nothttps://coolserver.minetest.net/woah/). If you do not have a domain name pointed to your server then do not add this setting or write anything for it, or the server list will reject your server.
- Should only be the domain name (e.g.
server_url- if you have a website for your server, then set this to the website URL.motd- a message that is sent to the player when they join. Use this to welcome them.- Note: You need to restart to make changes in minetest.conf take effect.
Protecting your server
Protecting the Minetest world/server
When setting up a new server, you should consider which protections are needed. This is extremely important for public servers, because you cannot predict who will connect or what they will do on your server.
Common problems include:
- Accidental or intentional damage to other players' work (griefing).
- Chat spam (may include swearing or advertisements).
- Aggression, harassment or other unwanted behaviours between players.
- Trouble makers who evade bans.
- Impersonation of well known people within the Minetest community.
- Bugs, for example caused by mods, which allow a malicious player to execute arbitrary system commands.
Many of these problems can be removed or minimised by advanced planning and awareness:
- Install a protection mod, such as areas or protectors. These allow players to protect areas, which cannot be changed by other players.
- Enable rollback by adding
enable_rollback_recording = trueto minetest.conf. Rollback can tell you which player placed a node, and allows a player's actions to be reverted.- NOTE: The engine rollback functionality is very limited and can't roll back griefing caused by mod-made node changes (e.g. spawning a bunch of trees or covering things in water). In addition to rollback, you should also always make regular backups of the map database.
- Install a mod to help you manage bans, such as xban2.
- On the other hand, if you are setting up a private server, install a whitelist mod such as whitelist.
- Create rules for your server and make sure you have enough time (or a team of moderators) to supervise your server and watch for players who breaks your rules.
- Never grant privileges to a player just because they use a name you recognise. Player names are not reserved between servers, so you should always confirm who the player is.
- Install and configure a chat filter mod like filter, to prevent swearing and/or sexual chat. This is useful to inform players of the rules rather than actual enforcement, as working around filters is fairly easy.
For more mods useful to server administration, see the Server Moderation and Tools tag on ContentDB. See also the SzUtilPack package which is a modpack by Warr1024 that contains a lot of useful mods for server management such as automatic restarts, pruning players or additional useful chatcommands.
Protecting the host machine
- Standard advice on Linux/Windows server security applies.
- On Linux you can add a dedicated user for running the minetest server.
- Never, ever, disable mod security.
- Make sure you trust mods you add to secure.trusted_mods
Managing your server
Server Configuration
For a detailed explanation of the server configuration file, see the minetest.conf page.
You may also want to consider to use a different database backend for your world.
Server Commands
See the Server commands page for a list of useful commands.
Also see Itemstrings for the itemstrings for use with the /give and /giveme commands.
Privilege System
See the privileges page for detailed information on the privilege system.
See also
- If your server has lots of media it may be useful to set up a remote media server for it.
- For more possible commands study the Command line page.
- The "Illustrated Server Creation Guide" forum thread contains interesting discussion.
- See this forum thread for more information about "How to create and maintain a server - Windows"
- See this forum thread for "Server performance settings"